OCI Kubernetes Monitoring Solution
OCI Kubernetes Monitoring Solution is a turn-key Kubernetes monitoring and management package based on OCI Logging Analytics cloud service, OCI Monitoring, OCI Management Agent and Fluentd.
It enables DevOps, Cloud Admins, Developers, and Sysadmins to
- Continuously monitor health and performance
- Troubleshoot issues and identify their root causes
- Optimize IT environment based on long term data
- Identify configuration, and security issues
across their entire environment - using Logs, Metrics, and Object metadata.
It does extensive enrichment of logs, metrics and object information to enable cross correlation across entities from different tiers in OCI Logging Analytics. A collection of dashboards is provided to get users started quickly.
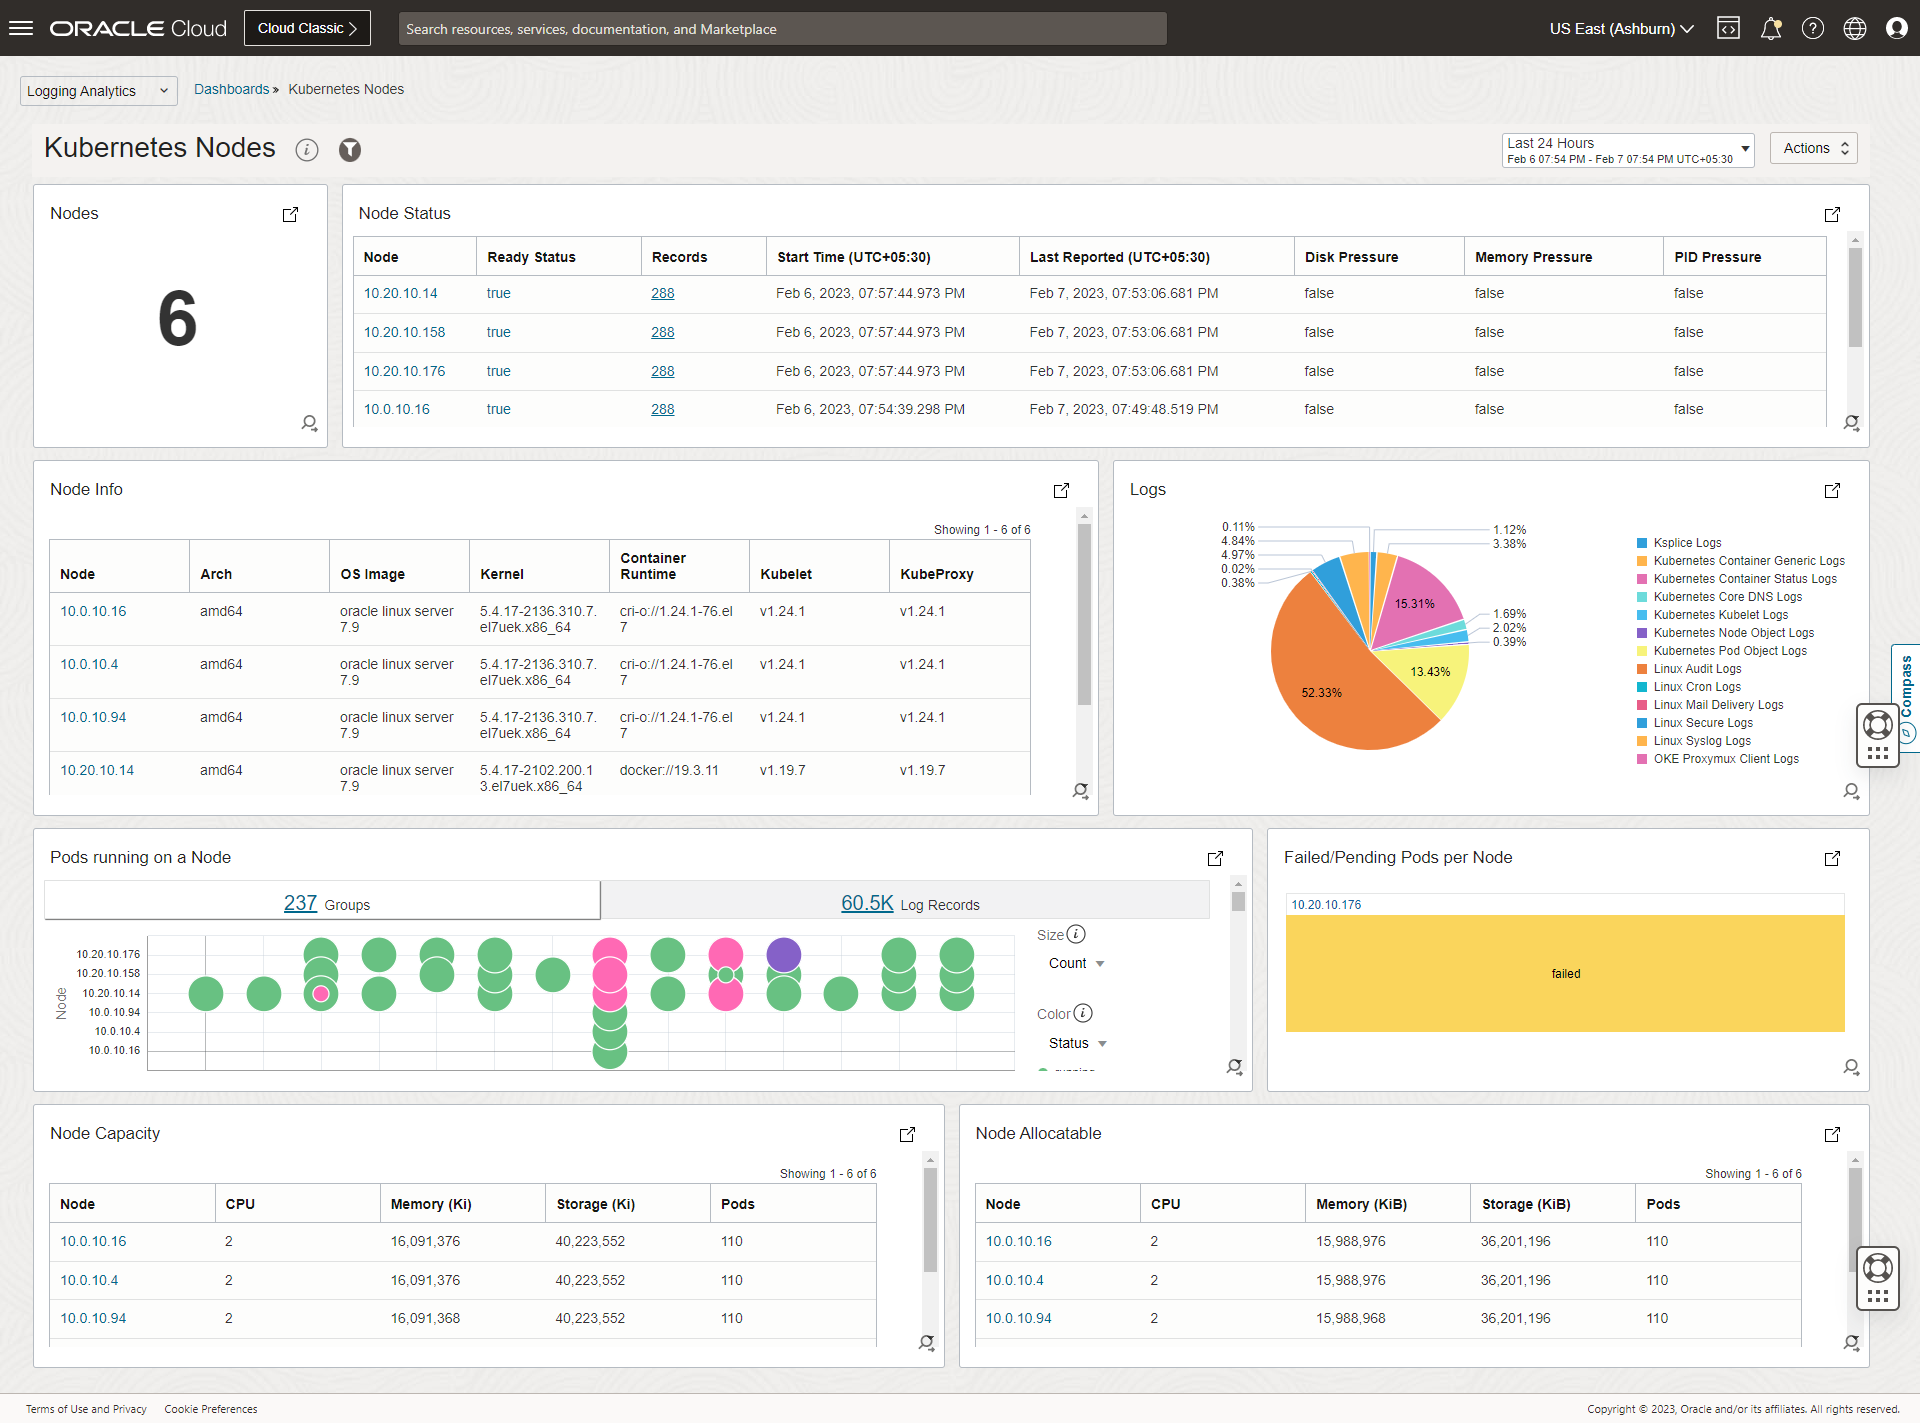
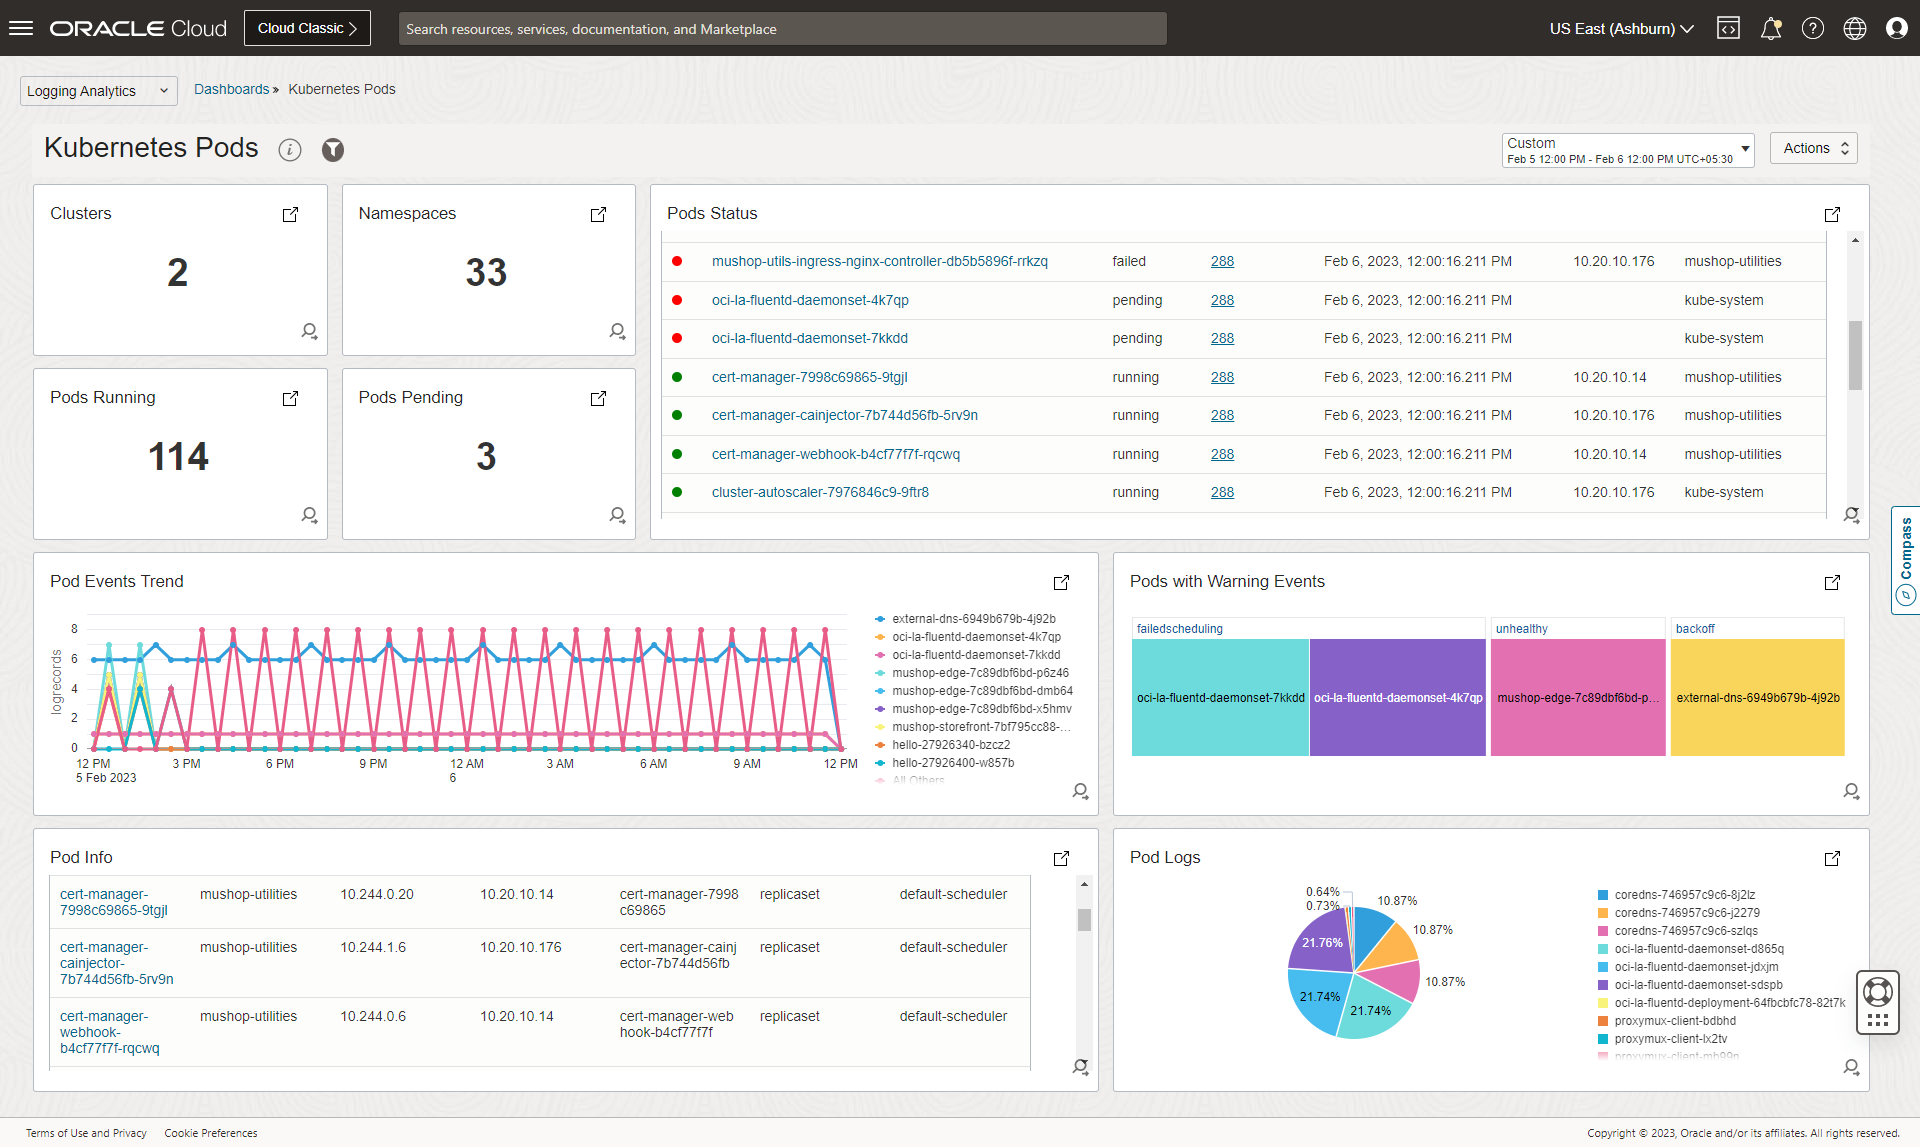
Dashboards
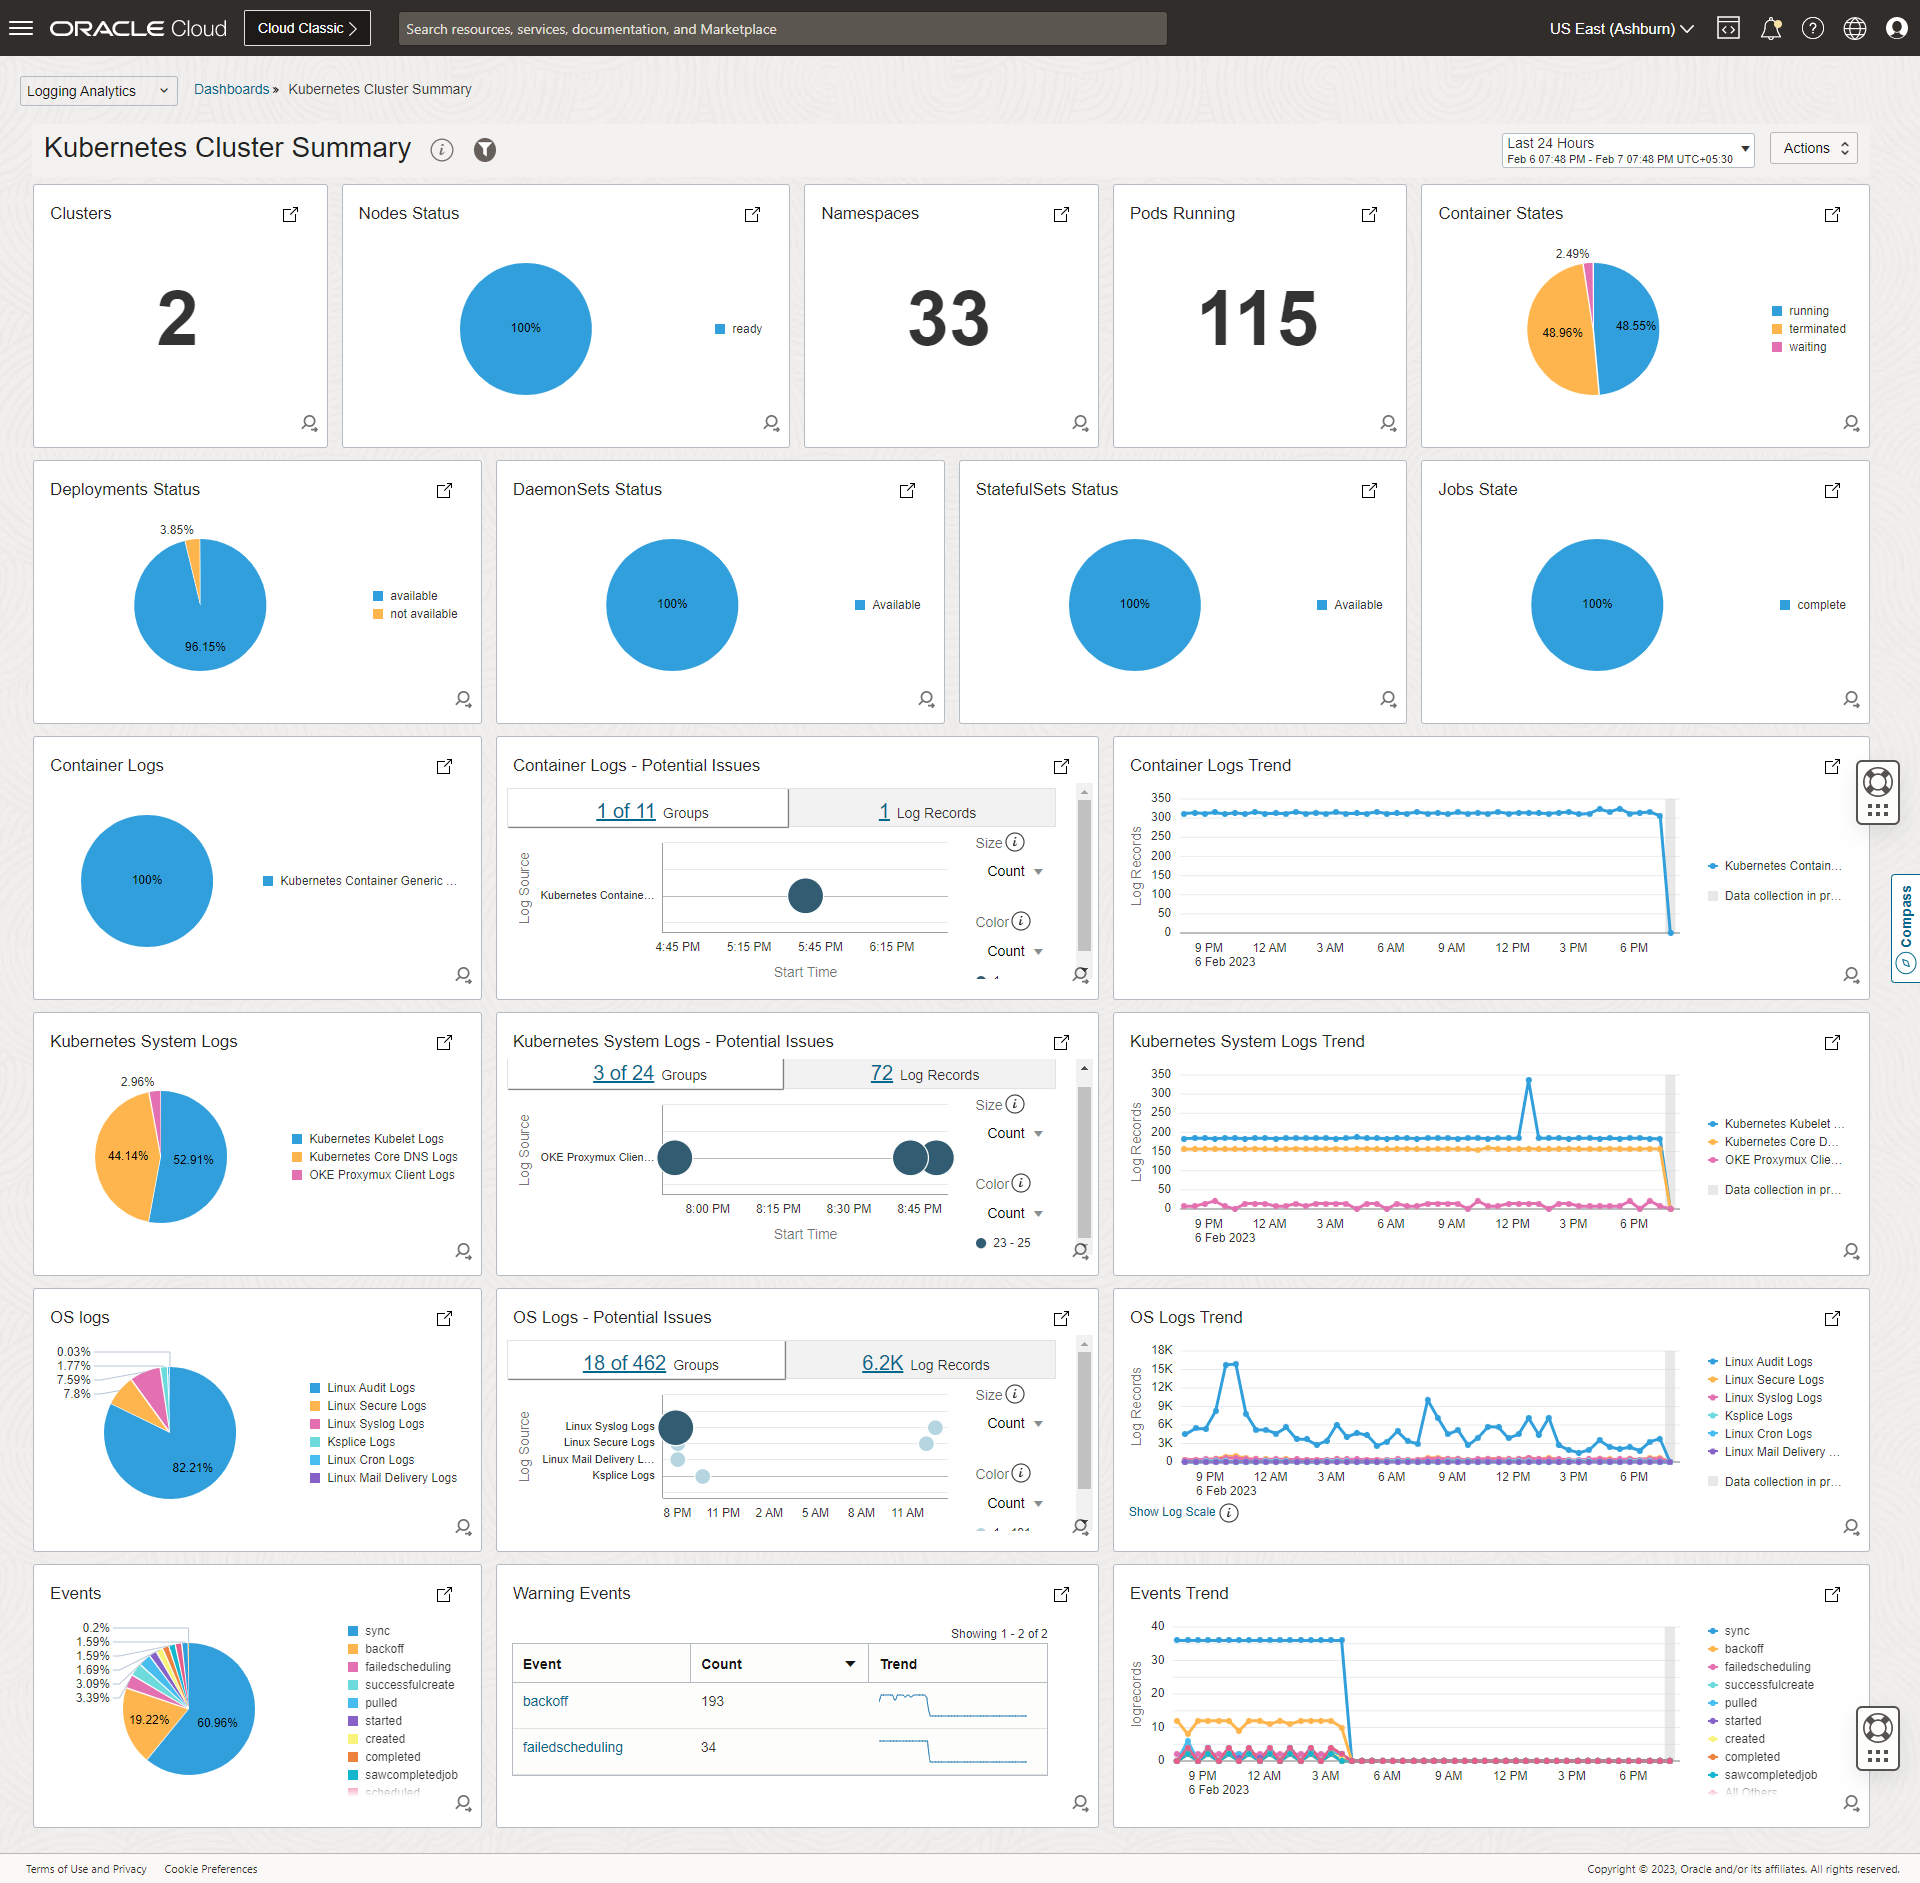
Expand for more dasshboard screenshots

Get Started :rocket:
:stop_sign: Upgrading to a major version (like 2.x to 3.x)? See upgrade section below for details. :warning:
Pre-requisites
- OCI Logging Analytics service must be onboarded with the minumum required policies, in the OCI region where you want to monitor. Refer Logging Analytics Quick Start for details.
- Create OCI Logging Analytics LogGroup(s) if not done already. Refer Create Log Group for details.
- OCI Dynamic Groups, User Group and Policies.
Details
* Create a dynamic group with the following sample rule for OCI Management Agent. Refer [Managing Dynamic Groups](https://docs.oracle.com/en-us/iaas/Content/Identity/Tasks/managingdynamicgroups.htm) for details.
```
ALL {resource.type='managementagent', resource.compartment.id='OCI Management Agent Compartment OCID'}
```
* Create a dynamic group with following sample rule for OKE Instances.
```
ALL {instance.compartment.id='OCI Management Agent Compartment OCID'}
```
- **Note**: _This dynamic group is not required for non OKE or when you choose to use Config file based AuthZ for monitoring the logs._
* Create a user and user group using which the logs to be published to OCI Logging Analytics. Refer [Managing Users](https://docs.oracle.com/en-us/iaas/Content/Identity/Tasks/managingusers.htm) and [Managing User Groups](https://docs.oracle.com/en-us/iaas/Content/Identity/Tasks/managinggroups.htm) for details.
- **Note**: _This is not required for OKE when you choose to use the default (Instance princiapal) AuthZ mechanism._
* Create a policy with following statements.
* Policy Statement for providing necessary access to upload the metrics.
```
Allow dynamic-group to use metrics in compartment WHERE target.metrics.namespace = 'mgmtagent_kubernetes_metrics'
```
* Policy Statement for providing necessary access to upload the logs and objects data.
```
Allow dynamic-group to {LOG_ANALYTICS_LOG_GROUP_UPLOAD_LOGS} in compartment
```
OR
```
Allow group to {LOG_ANALYTICS_LOG_GROUP_UPLOAD_LOGS} in compartment
```
</details>
Installation instructions
Multiple methods of installation are avialble, with following differences:
| Deployment Method |
Supported Environments |
Collection Automation |
Dashboards |
Customzations |
| Helm |
All* |
:heavy_check_mark: |
Manual |
Full Control (Recommended) |
| OCI Resource Manager |
OKE |
:heavy_check_mark: |
:heavy_check_mark: |
Partial Control |
| Terraform |
OKE |
:heavy_check_mark: |
:heavy_check_mark: |
Partial Control |
| kubectl |
All* |
Manual |
Manual |
Full Control (Not recommended) |
* For some environments, modification of the configuration may be required.
Helm
0 Pre-requisites
1 Download helm chart
2 Update values.yaml
- Create override_values.yaml, to override the minimum required variables in values.yaml.
- override_values.yaml
global:
  # -- OCID for OKE cluster or a unique ID for other Kubernetes clusters.
  kubernetesClusterID:
  # -- Provide a unique name for the cluster. This would help in uniquely identifying the logs and metrics data at OCI Logging Analytics and OCI Monitoring respectively.
  kubernetesClusterName:

oci-onm-logan:
  # Go to OCI Logging Analytics Administration, click Service Details, and note the namespace value.
  ociLANamespace:
  # OCI Logging Analytics Log Group OCID
  ociLALogGroupID:

oci-onm-mgmt-agent:
  mgmtagent:
    # Provide the base64 encoded content of the Management Agent Install Key file
    installKeyFileContent:
- Refer to the oci-onm chart and sub-charts values.yaml for customising or modifying any other configuration. It is recommended to not modify the values.yaml provided with the charts, instead use override_values.yaml to achieve the same.
3.a Install helm release
Use the following helm install command to the install the chart. Provide a desired release name, path to override_values.yaml and path to helm chart.
helm install <release-name> --values <path-to-override-values.yaml> <path-to-helm-chart>
Refer this for further details on helm install.
3.b Upgrade helm release
Use the following helm upgrade command if any further changes to override_values.yaml needs to be applied or a new chart version needs to be deployed.
helm upgrade <release-name> --values <path-to-override-values.yaml> <path-to-helm-chart>
Refer this for further details on helm upgrade.
3.c Import Dashboards
Dashboards needs to be imported manually. Below is an example for importing Dashboards using OCI CLI.
- Download and configure OCI CLI or open cloud-shell where OCI CLI is pre-installed. Alternative methods like REST API, SDK, Terraform etc can also be used.
- Find the OCID of the compartment, where the dashboards need to be imported.
- Download the dashboard JSONs from here (TBD).
- Replace all the instances of the keyword - “
${compartment_ocid}” in the JSONs with the Compartment OCID identified in previous step.
-
Run the following commands to import the dashboards.
 oci management-dashboard dashboard import --from-json file://cluster.json
 oci management-dashboard dashboard import --from-json file://node.json
 oci management-dashboard dashboard import --from-json file://workload.json
 oci management-dashboard dashboard import --from-json file://pod.json
4 Uninstall
Use the following helm uninstall command to uninstall the chart. Provide the release name used when creating the chart.
helm upgrade <release-name> --values <path-to-override-values.yaml> <path-to-helm-chart>
Refer this for further details on helm uninstall.
OCI Resource Manager
Launch OCI Resource Manager Stack in OCI Tenancy and Region of the OKE Cluster, which you want to monitor.
[![Launch OCI Resource Manager Stack][orm_button]][oci_kubernetes_monitoring_stack]
Instructions
* Select the region and compartment where you want to deploy the stack.
* Follow the on-screen prompts and instructions to create the stack.
* After creating the stack, click Terraform Actions, and select Plan.
* Wait for the job to be completed, and review the plan.
* To make any changes, return to the Stack Details page, click Edit Stack, and make the required changes. Then, run the Plan action again.
* If no further changes are necessary, return to the Stack Details page, click Terraform Actions, and select Apply.
Kubectl
While the recommended approach for installation is through helm, if you intend to use `kubectl` based installation, then the resource yaml files can still be generated through `helm` using the instructions provided below.
##### 0 Pre-requisites
* Workstation or OCI Cloud Shell with access configured to the target k8s cluster.
* Helm ([Installation instructions](https://helm.sh/docs/intro/install/)).
* Kubectl ([Installation instructions](https://kubernetes.io/docs/tasks/tools/#kubectl)).
##### 1 Download helm chart
Refer [here](#1-download-helm-chart).
##### 2 Update values.yaml
Refer [here](#2-update-valuesyaml).
##### 3.a Generate yamls
Use the following `helm template` command to generate the resource yaml files. Provide path to override_values.yaml, path to helm chart and path to a dir where the yaml files to be generated.
```
helm template --values --output-dir
```
Refer [this](https://helm.sh/docs/helm/helm_template/) for further details on `helm template`.
##### 3.b Install
Use `kubectl` tool to apply the yaml files generated in the previous step in the following order.
* oci-onm-common
```
kubectl apply -f namespace.yaml
kubectl apply -f clusterrole.yaml
kubectl apply -f clusterrolebinding.yaml
kubectl apply -f serviceAccount.yaml
```
* oci-onm-logan
```
kubectl apply -f logs-configmap.yaml
kubectl apply -f objects-configmap.yaml
kubectl apply -f fluentd-daemonset.yaml
kubectl apply -f fluentd-deployment.yaml
```
_For non OKE or when you choose to use Config file based AuthZ for monitoring the logs, you may need to apply oci-config-secret.yaml before applying fluentd-daemonset.yaml & fluentd-deployment.yaml. Refer [here](/oci-kubernetes-monitoring/docs/FAQ.html#how-to-use-configfile-based-authz-user-principal-instead-of-default-authz-instance-principal-) for how to configure Config based AuthZ._
* oci-onm-mgmt-agent
```
kubectl apply -f mgmt-agent-secrets.yaml
kubectl apply -f metrics-configmap.yaml
kubectl apply -f mgmt-agent-statefulset.yaml
kubectl apply -f mgmt-agent-headless-service.yaml
kubectl apply -f metric_server.yaml
```
##### 3.c Import Dashboards
Refer [here](#3c-import-dashboards).
</details>
### Upgrading to a major version
#### 2.x to 3.x
One of the major changes introduced in 3.0.0 is refactoring of helm chart where major features of the solution got split into separate sub-charts. 2.x has only support for logs and objects collection using Fluentd and OCI Logging Analytics and this is now moved into a separate chart oci-onm-logan and included as a sub-chart to the main chart oci-onm. This is a breaking change w.r.t the values.yaml and any customisations that you might have done on top of it. There is no breaking change w.r.t functionality offered in 2.x. For full list of changes in 3.x, refer to [changelog](/oci-kubernetes-monitoring/CHANGELOG.html).
You may fall into one of the below categories and may need to take actions accordingly.
##### Have no customisations to the existing chart or values.yaml
We recommend you to uninstall the release created using 2.x chart and follow the installation instructions mentioned [here](#helm) for installing the release using 3.x chart.
###### Sample 2.x values.yaml (external or override yaml to update the mandatory variables)
image:
url:
imagePullPolicy: Always
ociLANamespace:
ociLALogGroupID: ocid1.loganalyticsloggroup.oc1.phx.amaaaaaa......
kubernetesClusterID: ocid1.cluster.oc1.phx.aaaaaaaaa.......
kubernetesClusterName:
###### Sample 3.x values.yaml
global:
# -- OCID for OKE cluster or a unique ID for other Kubernetes clusters.
kubernetesClusterID: ocid1.cluster.oc1.phx.aaaaaaaaa.......
# -- Provide a unique name for the cluster. This would help in uniquely identifying the logs and metrics data at OCI Logging Analytics and OCI Monitoring respectively.
kubernetesClusterName:
oci-onm-logan:
# Go to OCI Logging Analytics Administration, click Service Details, and note the namespace value.
ociLANamespace:
# OCI Logging Analytics Log Group OCID
ociLALogGroupID: ocid1.loganalyticsloggroup.oc1.phx.amaaaaaa......
##### Have customisations to the existing chart or values.yaml
If you have modified values.yaml provided in helm chart directly, we recommend you to identify all the changes and move them to override_values.yaml and follow the instructions provided in install or upgrade sections under [this](#helm). We recommend you to use override_values.yaml for updating values for any variables or to incorporate any customisations on top of existing values.yaml.
If you are already using a separate values.yaml for your customisations, you still need to compare 2.x vs 3.x variable heirarchy and make the necessary changes accordingly.
Examples
##### Example 1: Using docker runtime instead of default runtime (cri)
**2.x**
runtime: docker
image:
url:
imagePullPolicy: Always
ociLANamespace:
ociLALogGroupID: ocid1.loganalyticsloggroup.oc1.phx.amaaaaaa......
kubernetesClusterID: ocid1.cluster.oc1.phx.aaaaaaaaa.......
kubernetesClusterName:
**3.x**
global:
# -- OCID for OKE cluster or a unique ID for other Kubernetes clusters.
kubernetesClusterID: ocid1.cluster.oc1.phx.aaaaaaaaa.......
# -- Provide a unique name for the cluster. This would help in uniquely identifying the logs and metrics data at OCI Logging Analytics and OCI Monitoring respectively.
kubernetesClusterName:
oci-onm-logan:
runtime: docker
# Go to OCI Logging Analytics Administration, click Service Details, and note the namespace value.
ociLANamespace:
# OCI Logging Analytics Log Group OCID
ociLALogGroupID: ocid1.loganalyticsloggroup.oc1.phx.amaaaaaa......
##### Example 2: Customisation of a specific log
**2.x**
...
...
custom-log1:
path: /var/log/containers/custom-1.log
ociLALogSourceName: "Custom1 Logs"
#multilineStartRegExp:
isContainerLog: true
...
...
**3.x**
...
...
oci-onm-logan:
...
...
custom-log1:
path: /var/log/containers/custom-1.log
ociLALogSourceName: "Custom1 Logs"
#multilineStartRegExp:
isContainerLog: true
...
...
...
...
*The difference is all about moving the required configuration (variable definitions) under oci-onm-logan section appropriately.*
</details>
## Getting Help
#### [Ask a question](https://github.com/oracle-quickstart/oci-kubernetes-monitoring/discussions/new?category=q-a)
## Resources
#### :question: [Frequently Asked Questions](/oci-kubernetes-monitoring/docs/FAQ.html)
#### [Custom Logs Configuration](/oci-kubernetes-monitoring/docs/custom-logs.html)
#### [Building Custom Container Images](/oci-kubernetes-monitoring/docs/custom-images.html)
## License
Copyright (c) 2023, Oracle and/or its affiliates.
Licensed under the Universal Permissive License v1.0 as shown at <https://oss.oracle.com/licenses/upl>.
## [Contributors][def]
[def]: https://github.com/oracle-quickstart/oci-kubernetes-monitoring/graphs/contributors
[orm_button]: https://oci-resourcemanager-plugin.plugins.oci.oraclecloud.com/latest/deploy-to-oracle-cloud.svg
[oci_kubernetes_monitoring_stack]: https://cloud.oracle.com/resourcemanager/stacks/create?zipUrl=https://github.com/oracle-quickstart/oci-kubernetes-monitoring/releases/latest/download/oci-kubernetes-monitoring-stack.zip